
WRAPPING LINERS – Materials needed: Fabric, liner, FABRIMOUNT, foam-type paint roller, a sharp pair of scissors, sharp razor blades, a clean cutting surface.
Begin by chopping the liner in the normal manner. For purposes of this instruction, we will describe the procedure for “end wrapping” the liners. This means that the mitered edges will be wrapped with fabric so that you will be joining fabric-to-fabric, providing a high-quality, “tucked-in”, upholstered look at the corners.
Lay the fabric on the cutting surface and place the four legs of the liner on it. If the fabric has a noticeable “grain”, take the precaution to lay the vertical (side) legs against the grain, and the horizontal (top and bottom) legs with the grain.
(See figure 7). 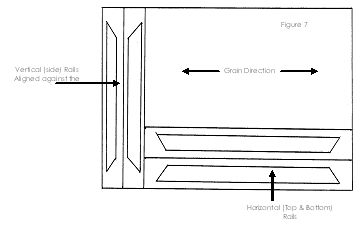
Please note that the grain always runs across the width of the fabric, from edge to edge.) By doing so, you will wind up with the grain running horizontally across the picture after the liner is joined. This is in keeping with the grain as it appears on drapes, wall coverings, and wall treatments in general. — Here it is important to note that many fabrics have no noticeable grain to speak of, in which case you would place all four legs with the grain in the interests of using the least fabric possible. — Using a sharp razor blade, cut four strips of fabric, one for each leg, leaving about one inch extra all around. Be sure to keep the strips of fabric with the appropriate legs so as to avoid mistakes. You are now ready to start using the FABRIMOUNT.
Pour FABRIMOUNT into a paint tray. FABRIMOUNT is similar in viscosity to pancake batter, so it is possible to pour it onto a piece of scrap matboard if you don’t have a clean paint tray available. Pour enough adhesive to complete the project without having to stop and pour more. Remember, time is critical because this is an air-dry adhesive. The formulation is perfect as is, so please DO NOT DILUTE! (Diluting will reduce the adhesive quality and increase the potential for swelling.)
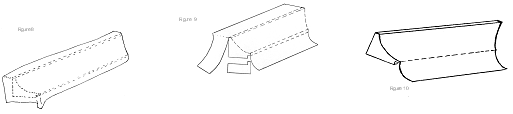
“Load” the roller with adhesive and begin applying the adhesive to the face and the mitered edges of the liner (Figure 8). Please be sure to eliminate any runs or concentrations of adhesive that might cause bleed-through. As soon as you have a uniform coat, place the fabric on the liner and make sure that the grain is properly aligned. Remember, the fabric will not adhere until you apply pressure. When wrapping deep scoops, it is preferable to adhere the fabric to the center of the scoop first then work it gently toward the lip and the top. This will minimize any stress that might later cause the fabric to “bubble”. It is not necessary to pull or stretch the fabric when mounting. Simply massage the fabric onto the liner, gradually increasing the pressure as the adhesive dries. The only exception might be on deep scoops, where you may have to exert a little more “force” than usual on the fabric to get the mitered edges covered.
Trim the fabric from the back of the liner by using a sharp razor blade, and use sharp scissors to trim around the mitered edges (Figure 9), following the outline of the profile. To complete the procedure, use the edge of the roller to apply adhesive under the lip of the liner then wrap the fabric carefully around the lip, starting at the center of each leg and working your way toward the mitered ends (Figure 10). The last step consists simply of running a razor blade along the inside corner under the lip, cutting away the excess fabric. When all four legs are complete, you may join the liner using your preferred joining method.
From the time you pour the FABRIMOUNT, you can expect to spend about 15 minutes wrapping and trimming a liner. With practice, you can cut the time down to ten or twelve minutes.
MOUNTING PRINTS, POSTERS, and CANVAS TRANSFERS – When mounting paper items, proceed as above, but allow the FABRIMOUNT to dry for four or five minutes. (Do not wait longer than five minutes. If the adhesive dries too much, you will not be able to reactivate it. And please do not attempt to mount paper on wet adhesive.) As soon as the five minutes elapse, position your art on the substrate then cover with protective paper and place in a heat press for three minutes at 180 degrees. The heat will reactivate the adhesive, providing an excellent, economical bond.
© Neuberg & Neuberg Importers Group, Inc. All rights are reserved.